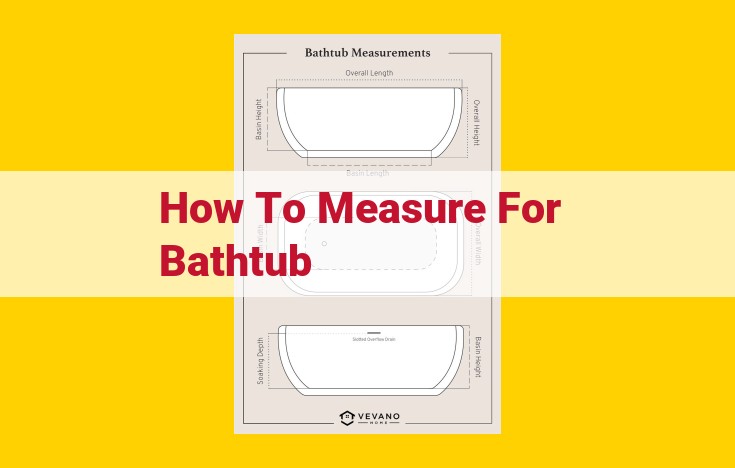
To ensure a perfect fit, measuring for a bathtub is crucial. Start by determining the length and width of the space where the tub will be installed. Measure the distance from the wall to the opposite wall, and the distance from the end of the tub to the nearest wall. Record these measurements carefully. Additionally, note the height of the existing drain and overflow to ensure the new bathtub can be properly connected.
Bathtub Installation Guide: Choosing the Perfect Bathtub
Bathtubs come in a wide array of styles, materials, and sizes, each offering unique advantages and aesthetic appeal. Here’s a closer look at the different types of bathtubs available to help you make an informed decision:
Freestanding Bathtubs:
Freestanding bathtubs stand independently from the walls and floor, offering a luxurious and elegant touch to any bathroom. They come in a variety of shapes, from classic rectangular to more contemporary oval or asymmetrical designs. Freestanding bathtubs can be made from various materials, including acrylic, fiberglass, cast iron, or natural stone, allowing you to match your bathtub to your bathroom’s décor.
Alcove Bathtubs:
Alcove bathtubs are designed to fit snugly into a three-walled alcove, making them a practical choice for smaller bathrooms or where space is limited. They come in standard sizes to fit most alcoves and are typically made of acrylic or fiberglass, offering durability and easy maintenance.
Corner Bathtubs:
Corner bathtubs are a great way to maximize space in smaller bathrooms. They are designed to fit into the corner of a room, creating a more spacious feel. Corner bathtubs come in various shapes and sizes, including triangular, pentagonal, and hexagonal designs.
Drop-In Bathtubs:
Drop-in bathtubs are designed to be installed within a pre-built surround. They offer a seamless look and can be made from a variety of materials to complement your bathroom’s style. Drop-in bathtubs require more precise measurements and installation than other bathtub types.
Soaker Bathtubs:
Soaker bathtubs are specifically designed for relaxation. They are typically deeper than standard bathtubs and may feature ergonomic contours or massage jets to provide a luxurious and rejuvenating bathing experience. Soaker bathtubs can be made from a variety of materials, including acrylic, fiberglass, or cast iron.
Bathtub Apron: The Unsung Hero of Bathroom Comfort
In the symphony of bathroom design, the bathtub apron often plays a subtle yet pivotal role. It’s not just a decorative touch, but a functional element that enhances the experience of your daily ablutions.
The primary purpose of a bathtub apron is to conceal the unattractive plumbing beneath the bathtub. By creating a seamless and watertight seal around the base, it prevents water from leaking and causing damage to your bathroom floor.
But the apron does more than just hide ugly pipes. It also provides additional support for the bathtub, ensuring its stability and longevity. And let’s not forget its aesthetic charm. A well-chosen apron can complement the style of your bathroom and add a touch of sophistication.
Materials for bathtub aprons vary widely. Acrylic, known for its durability and resistance to stains, is a popular choice. Tile offers endless design possibilities and can create a custom look. Fiberglass is a lightweight and budget-friendly option that can be molded into various shapes.
The choice of material depends on your budget, aesthetic preferences, and the overall style of your bathroom. But no matter which material you choose, a bathtub apron is an essential element that will elevate your bathing experience and keep your bathroom looking its best.
Bathtub Deck: Your Haven of Style and Comfort
When embarking on a bathroom renovation, the bathtub deck often takes center stage, inviting you to unwind and soak away your worries. As you plan its installation, consider these aspects to create a deck that perfectly complements your bathtub and bathroom.
Materials: A Symphony of Options
The world of bathtub decks presents a captivating tapestry of materials, each offering its unique charm and characteristics.
- Tile: A timeless classic, tiles provide endless design possibilities and durability.
- Acrylic: Lightweight and cost-effective, acrylic decks are easy to clean and maintain.
- Natural Stone: Marble, granite, and limestone exude elegance and luxury, adding a touch of sophistication to your bathroom.
- Solid Surface: Non-porous and seamless, solid surface decks offer exceptional hygiene and durability.
Styles: From Minimalist to Opulent
The style of your bathtub deck should harmoniously blend with both the bathtub and your overall bathroom aesthetic.
- Monolithic: A seamless deck that seamlessly integrates with your bathtub, creating a sleek and modern look.
- Lipless: A deck with a subtle lip that provides a wider soaking area while maintaining a clean and contemporary aesthetic.
- Apron: A traditional style that conceals the bathtub’s rim, providing a touch of vintage charm and elegance.
- Pedestal: A freestanding deck that offers a dramatic and sophisticated statement, perfect for large bathrooms.
Installation: Precision in Every Step
The installation of your bathtub deck requires meticulous attention to detail to ensure a watertight and aesthetically pleasing result.
- Substrate Preparation: Ensure that the subfloor is level and free of any imperfections that could compromise the deck’s stability.
- Mounting: Secure the deck to the bathtub with screws or adhesive, following the manufacturer’s instructions precisely.
- Grouting and Sealing: For tiled decks, carefully apply grout and sealant to prevent moisture penetration and maintain a flawless appearance.
- Maintenance: Regularly clean and seal your deck to maintain its beauty and prevent premature wear and tear.
Bathtub Drain: Essential Considerations for Smooth Functionality
Your bathtub drain plays a crucial role in ensuring a seamless and enjoyable bathing experience. Selecting the right drain type, connecting it properly, and performing regular maintenance are essential to prevent water damage, unpleasant odors, and clogging issues.
Drain Types: A World of Options
Bathtub drains come in various types, each with its unique advantages and disadvantages:
- Pop-up drains: Operated by a simple push or pull mechanism, pop-up drains offer easy hair removal and convenient overflow protection.
- Trip lever drains: These drains feature a lever that activates a stopper to close and open the drain. They are durable and easy to operate.
- Toe-touch drains: As the name suggests, these drains are operated by pressing a button with your toe. They are convenient and provide a sleek, minimalist look.
Connections: A Precision Task
Proper drain connection is vital for efficient water flow and leak prevention. Here’s how to ensure a secure connection:
- Tighten the Basket Strainer: Use a wrench or pliers to firmly secure the basket strainer (the perforated metal or plastic part that catches hair and debris) to the drain body.
- Connect the Drainpipe: Apply plumber’s putty or Teflon tape to the threads of the drainpipe and connect it to the drain body. Tighten it securely by hand or using a wrench or pliers.
- Tighten the Overflow Tube: Similarly, apply plumber’s putty or Teflon tape to the threads of the overflow tube and connect it to the overflow hole in the bathtub. Tighten it securely.
Maintenance: Keeping Your Drain Sparkling
Regular maintenance is the key to a trouble-free bathtub drain. Here are some essential tips:
- Remove Hair and Debris: Regularly clean the hair and debris from the basket strainer to prevent clogs.
- Check the Drain Stopper: Inspect the drain stopper for wear and tear, and replace it if necessary.
- Clean the Drainpipe: Periodically pour a drain cleaner (follow the manufacturer’s instructions carefully) down the drain to remove mineral buildup and prevent clogs.
- Inspect the Overflow Tube: Occasionally inspect the overflow tube for any signs of damage or leaks.
By following these guidelines, you can ensure that your bathtub drain operates smoothly, preventing unnecessary headaches and maintaining a sanitary and pleasant bathing environment.
Bathtub Overflow: A Critical Safety Feature for Your Bathroom
In the tranquil sanctuary of our bathrooms, bathtubs offer a relaxing escape. While we immerse ourselves in a warm bath, it’s crucial to ensure the safety and functionality of our bathtubs. One key component that plays a pivotal role in preventing potential hazards is the bathtub overflow.
Functions of a Bathtub Overflow
The overflow is an essential safety mechanism that prevents excessive water accumulation in the bathtub. When the water level reaches a specific height, it flows through the overflow drain, preventing spillage and potential flooding of the bathroom or adjacent areas.
Materials and Design
Overflow drains are typically constructed from durable materials such as brass, plastic, or stainless steel. They come in various designs and finishes to complement different bathtub styles and bathroom decors.
Installation Requirements
Installing a bathtub overflow requires precision and proper execution. It involves carefully marking the overflow location on the bathtub rim and drilling a hole for the overflow drain. The drain is then secured using a sealant or gasket to ensure a watertight connection.
Maintenance and Care
Regular maintenance is essential to keep the overflow functioning optimally. Periodic cleaning with vinegar or a mild cleaning solution helps prevent mineral buildup and clogs. Regularly inspecting the overflow drain for any damage or leaks is also recommended for added peace of mind.
By ensuring the proper installation and maintenance of your bathtub overflow, you not only add an aesthetic touch to your bathroom but also enhance the safety and functionality of your bathing experience. Remember, a well-maintained overflow is a critical line of defense against potential water damage, making it a wise investment for any bathroom renovation or upgrade.
Bathroom Layout: Designing Your Zen Bathing Oasis
When embarking on a bathtub installation, it’s essential to consider the overall bathroom layout to create a harmonious and functional space.
Space Constraints: Measuring and Planning
Before purchasing a bathtub, meticulously measure the available space to ensure a seamless fit. Consider the placement of windows, doors, and other fixtures to avoid any obstructions. Remember, sufficient legroom is crucial for a comfortable bathing experience.
Door Placement: Accessibility and Convenience
The door should swing freely and provide ample space for entry and exit. Avoid bathtubs that would impede the door’s movement or compromise safety. Plan the bathtub’s position to allow for easy access from the door and surrounding fixtures.
Surrounding Fixtures: A Symphony of Style and Functionality
Consider the placement of sinks, toilets, and other fixtures to create an ergonomic and aesthetically pleasing design. Ensure sufficient space between fixtures to provide ample elbow room and prevent overcrowding. Arrange the bathtub in a way that maximizes functionality while enhancing the overall bathroom aesthetic.
By carefully considering these layout factors, you can craft a bathroom that not only meets practical needs but also invites relaxation and rejuvenation.
Existing Plumbing: Check existing plumbing for compatibility with the new bathtub.
Bathtub Installation Guide: Essential Considerations
Before embarking on a bathtub installation project, it’s crucial to ensure the compatibility of your existing plumbing with the new fixture. This step is often overlooked but can save you time, money, and headaches in the long run.
Checking Existing Plumbing
To begin, locate the water supply lines that will connect to your bathtub. Inspect these lines for any signs of damage, leaks, or corrosion. If necessary, have a licensed plumber repair or replace any compromised pipes.
Next, determine the location of the drain and overflow. The drain should be positioned directly below the bathtub, while the overflow is typically installed on the opposite end. Ensure that the drain and overflow align with the corresponding connections on the new bathtub.
Importance of Compatibility
Compatibility is key when matching existing plumbing to a new bathtub. Incompatibility can lead to a variety of problems, including:
- Leaking or dripping water
- Insufficient water flow or pressure
- Poor drainage
- Improper installation
By thoroughly checking your existing plumbing and ensuring compatibility with the new bathtub, you can avoid these potential issues and enjoy a hassle-free installation.
Prepare Your Bathtub’s Drainage: Ensuring Perfect Alignment
Before embarking on your bathtub installation adventure, it’s crucial to determine the location of your drain and its compatibility with the new tub. This seemingly simple step holds the key to a trouble-free drainage system that will keep your bathroom pristine and prevent any unwanted mishaps.
Mapping the Terrain: Locate the Drain
Begin by carefully examining the existing drainage system in your bathroom. Identify the drain’s location and trace its path to ensure it aligns seamlessly with the drain hole in your new bathtub. Using a measuring tape, take precise measurements from the drain to a fixed point in the bathroom, such as a wall corner or the center of the room. This will serve as your reference point later on.
Aligning the Stars: Matching Bathtub and Drain
Now, turn your attention to your new bathtub. Measure the distance from the drain hole to the edge of the tub’s rim. Compare this measurement to the distance you recorded earlier for the existing drain location. If they match up perfectly, you’re in luck! Your bathtub and drain are perfectly aligned for a harmonious drainage experience.
But what happens if the measurements don’t quite align? Fear not! In most cases, minor adjustments can be made to the drainpipe to accommodate the new bathtub’s position. Contact a qualified plumber who can expertly guide you through this process, ensuring that your bathtub drains flawlessly.
Overflow Location: Ensuring Seamless Water Management
As you embark on your bathtub installation journey, meticulous planning and attention to detail are paramount. Overflow location plays a crucial role in preventing water from spilling over the edge of the bathtub. Here’s a step-by-step guide to help you determine the optimal overflow position:
- Identify the Bathtub Overflow: Most bathtubs feature a small opening or hole near the top edge. This is the overflow and serves as a safety mechanism to prevent the tub from overflowing.
- Mark the Overflow Location: Using a level, mark the location of the overflow hole on the wall where the bathtub will be installed. Ensure the mark aligns perfectly with the overflow hole on the bathtub.
- Align the Overflow Pipe: The overflow pipe is a tube that connects the overflow hole to the drain. Once the overflow location is marked, determine the route for the overflow pipe and ensure it aligns with the drain.
- Install the Overflow Pipe: Follow the manufacturer’s instructions to install the overflow pipe and connect it securely to the overflow hole and the drain. This will create a channel for excess water to flow directly into the drain.
- Test the Overflow: Once the overflow pipe is installed, fill the bathtub with water to check if the overflow is functioning correctly. Water should flow smoothly into the overflow pipe and drain when the bathtub reaches its maximum capacity.
By carefully following these steps and aligning the overflow location precisely, you can ensure proper water management, preventing accidental overflows and preserving the integrity of your bathroom.
Wall Construction: Verifying Adequate Support for Your Bathtub Haven
When embarking on a bathtub installation journey, it’s crucial to ensure that the surrounding wall structure can withstand the weight and water load of your new oasis. Imagine the disappointment of discovering flimsy framing or weakened studs that threaten the integrity of your tranquil haven. To avoid such a nightmare, a thorough inspection of the wall construction is paramount.
Before you wield your tools, carefully examine the wall studs that will be bearing the weight of the bathtub. Sturdy studs should be evenly spaced and securely attached to the floor and ceiling joists. If any studs seem compromised or undersized, don’t hesitate to reinforce them with additional support. This will provide a solid foundation for your bathtub, ensuring a long-lasting sanctuary.
Next, check the wall framing around the area where the bathtub will rest. It should be level and free from any protrusions or irregularities. If necessary, adjust the framing to accommodate the specific dimensions of your bathtub. This meticulous attention to detail will create a seamless fit, preventing any annoying gaps or uneven edges that could compromise the aesthetic appeal and functionality of your bathing space.
Remember, a stable wall construction is the cornerstone of a successful bathtub installation. By carefully assessing and reinforcing the wall structure, you can create a sanctuary that invites relaxation and rejuvenation for years to come. Embrace the process, and let your bathtub become a masterpiece of comfort and support.
Bathtub Rim: A Key Element in Bathtub Installation
When it comes to bathtub installation, the bathtub rim may seem like a minor detail, but it plays a crucial role in both the aesthetics and functionality of your bathroom. Here’s a comprehensive guide to help you understand the different rim styles, their installation methods, and effective sealing techniques.
Types of Bathtub Rims
Bathtub rims come in various styles, each with its advantages:
- Tile Flange: This rim extends beyond the tub and is covered with tiles, creating a seamless transition between the tub and the bathroom wall.
- Integral Rim: Manufactured as part of the bathtub, this rim provides a watertight seal around the tub’s edge. Its clean lines offer a modern and minimalist look.
- Deck-Mounted: This rim fits onto the top of the bathtub, covering the rim and providing a deck-like surface. It offers additional space for toiletries and adds a touch of elegance.
Installation Methods
The installation method for bathtub rims varies depending on their type:
- Tile Flange: Installed during the tiling process, these flanges require precise measurements and proper sealing to prevent water leakage.
- Integral Rim: Pre-installed on the bathtub, they simplify installation and ensure a watertight seal.
- Deck-Mounted: Attached to the bathtub using screws or adhesives, these rims offer easy installation and allow for customization with different materials.
Sealing Techniques
Proper sealing is essential to prevent water damage and ensure a long-lasting installation:
- Caulk: A commonly used sealant, caulk is applied around the rim’s edges to fill gaps and create a watertight barrier.
- Grout: Suitable for tile flanges, grout is used to fill joints between tiles and create a waterproof seal.
- Silicone: A flexible sealant, silicone provides a durable and waterproof seal around the rim, especially in areas with high moisture levels.
Choosing the Right Bathtub Rim
When selecting a bathtub rim, consider the following factors:
- Bathroom Style: Match the rim style to the overall design of your bathroom, whether it’s traditional, modern, or contemporary.
- Accessibility: A higher lip height may provide better support for mobility-impaired individuals.
- Water Retention: A higher lip height helps prevent water from splashing out of the bathtub.
- Maintenance: Rims with concealed edges or self-draining properties require less cleaning and maintenance.
By understanding the different types, installation methods, and sealing techniques for bathtub rims, you can make an informed decision to enhance the aesthetics and functionality of your bathroom.
Bathtub Lip Height: Striking a Balance Between Accessibility and Water Retention
When embarking on a bathtub installation, one crucial aspect that often goes overlooked is the bathtub’s lip height. This seemingly minor detail plays a significant role in both accessibility and water retention, two factors that can greatly impact your bathing experience.
Accessibility: Enhancing Comfort and Safety
For individuals with limited mobility or physical impairments, a bathtub with a low lip height can make a world of difference. A lower lip eliminates the need to step over a high threshold, reducing the risk of falls and accidents. It also allows for effortless entry and exit, making bathing a more comfortable and enjoyable experience.
Water Retention: Preventing Unwelcome Spills
On the other hand, a bathtub with a too-low lip height can lead to unwelcome water spills. As you soak or splash in the tub, water may overflow, creating a messy bathroom floor. To prevent such mishaps, it’s essential to choose a bathtub with a lip height that is high enough to retain water effectively.
Finding the ideal lip height involves striking a balance between these two considerations. For optimal comfort and safety, aim for a lip height of around 12-15 inches (30-38 centimeters). This height provides sufficient water retention while still allowing for easy entry and exit.
Remember, your individual needs and preferences should guide your decision. If accessibility is paramount, opt for a lower lip height. Conversely, if water retention is a primary concern, consider a slightly higher lip.
By carefully considering the lip height, you can create a bathtub installation that seamlessly integrates accessibility, safety, and water retention. It’s a small detail that can make a big difference in your bathing experience.
