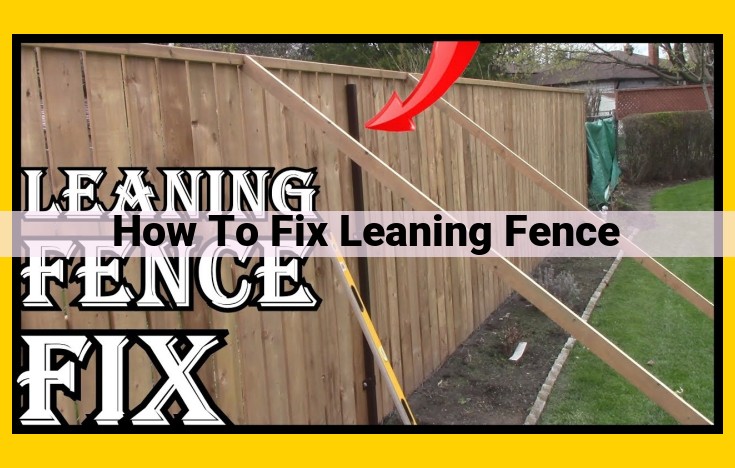
- Dig a hole next to the leaning post, deep enough for the post to be plumb.
- Insert a new post into the hole and fill the hole with concrete.
- Attach the leaning post to the new post with galvanized wire or lag bolts, pulling the leaning post plumb.
Materials List
- A comprehensive list of all necessary materials for building a fence, including fence posts, concrete mix, gravel, and hardware.
The Ultimate Materials List for Your Fence-Building Project
Embarking on a fence-building endeavor requires careful preparation, and gathering the essential materials is crucial. This comprehensive materials list will guide you through every aspect of construction, ensuring you have everything you need to create a sturdy, aesthetically pleasing fence.
Fence Posts: The Foundation of Your Fence
The foundation of your fence lies in the fence posts. These structural elements provide support and stability, so choose wisely based on your fence’s purpose, height, and material preferences. Wood posts offer a classic and versatile option, while metal posts are more durable and require less maintenance. Plastic posts, on the other hand, are low-maintenance and resistant to rot.
Concrete Mix: The Anchor for Your Posts
Concrete mix is essential for securing your fence posts firmly in the ground. Opt for a quick-setting concrete mix to ensure a rapid and stable foundation. Gravel serves as a base for the concrete, providing drainage and preventing water accumulation.
Hardware: Connecting the Elements
Hardware plays a crucial role in assembling your fence. Nails or screws will connect fence boards to posts, while specialized brackets can provide additional support. Hinges and latches are essential for gates, allowing for easy access.
Additional Considerations
Depending on your design preferences and security requirements, you may consider incorporating additional elements into your fence:
- Wire Mesh: A wire mesh can provide an extra layer of security or improve aesthetics.
- Brace Boards: Brace boards offer enhanced stability to tall or long fences.
- Post Caps: Post caps protect the tops of your fence posts from water damage and enhance their appearance.
- Paint or Stain: Finishing touches like paint or stain can customize the look of your fence and extend its lifespan.
Essential Tools for Fence Construction: A Comprehensive Guide
Embarking on a fencing project requires not only the right materials but also the essential tools that will make the process smooth and efficient. Here’s a thorough overview of the tools you’ll need to build a sturdy and long-lasting fence:
Post Hole Digger: Your Groundwork Ally
Start your fence installation by digging holes for the fence posts. A post hole digger is your trusty companion for this task. Choose between manual or powered models depending on the number and depth of holes you need.
Saw: Precision Cutting for Fence Posts
Cutting fence posts to the desired length and angles is crucial. A circular saw or mitre saw will provide you with precise cuts, ensuring that your posts fit together perfectly.
Hammer or Drill: The Driving Force
Both a hammer and a drill are indispensable tools for fastening fence boards to posts. While a hammer delivers brute force, a drill offers controlled driving and can also be used for pre-drilling holes to prevent splitting.
Measuring Tape: Accuracy is Key
A measuring tape is your indispensable tool for measuring distances, ensuring that your fence posts are evenly spaced and your fence boards are cut to the correct length.
Line Level: Aligning for Perfection
Achieve a level and straight fence with a line level. This tool helps you align fence posts and boards horizontally and vertically, resulting in a professional-looking finish.
Other Essential Tools
In addition to the core tools mentioned above, consider the following:
- Safety glasses and gloves for protection
- Clamps for holding fence boards in place while nailing or screwing
- Pencil for marking cuts and measurements
- Hoe or shovel for filling in around the fence posts
With these essential tools at your disposal, you can confidently embark on your fencing project and build a strong, secure, and aesthetically pleasing barrier around your property.
Where to Source Fencing Materials: A Comprehensive Guide
When embarking on a fencing project, acquiring the necessary materials is crucial for a successful outcome. Here’s where you can find everything you need to build a sturdy and aesthetically pleasing fence:
Home Improvement Stores
For convenience, home improvement stores like Home Depot and Lowe’s are one-stop shops for fencing materials. They offer a wide selection of fence posts, boards, and hardware, making it easy to find everything in one place.
Lumber Yards
Lumber yards specialize in timber products, ensuring quality and durability for your fence. They stock a variety of wood species to meet your aesthetic and budget requirements. Their knowledgeable staff can also provide advice on the best materials for your specific needs.
Fencing Companies
Fencing companies offer a comprehensive range of materials, including custom-made components. They can provide expert guidance on material selection and installation techniques. While their prices may be slightly higher, you’ll benefit from professional expertise and a tailored solution.
Additional Considerations
- Location: Choose suppliers that are conveniently located to minimize transportation costs.
- Reputation: Read customer reviews and look for businesses with a good track record.
- Online Options: Explore reputable online retailers for competitive prices and a wider selection.
- Bulk Discounts: Consider purchasing materials in bulk quantities to secure discounts.
- Delivery Services: Inquire about delivery services to save time and effort.
By sourcing materials from reliable suppliers, you can ensure the quality and availability of everything you need for a successful fencing project.
Choosing the Right Fence Posts for a Sturdy and Durable Fence
Building a fence is a rewarding project that can enhance the security, privacy, and aesthetics of your property. One crucial aspect of any fencing project is selecting the right fence posts. These posts serve as the backbone of your fence, providing support and stability to the entire structure. Here’s a comprehensive guide to help you make informed decisions when choosing fence posts:
Material Selection
The material you choose for your fence posts will significantly impact the durability and lifespan of your fence. Here are the three most common materials used for fence posts:
- Wood: Wood is a traditional and widely available option for fence posts. It is relatively inexpensive and easy to work with. However, wood requires regular maintenance, such as painting or staining, to protect it from rot, insects, and moisture damage.
- Metal: Metal posts, such as galvanized steel or aluminum, offer superior strength and durability compared to wood. They are resistant to rot, insects, and fire, making them a low-maintenance option. However, metal posts can be more expensive than wood.
- Plastic: Plastic posts are a lightweight and durable option. They are resistant to rot, insects, and moisture damage. Additionally, plastic posts are easy to install and require minimal maintenance.
Durability and Strength
The durability and strength of your fence posts will determine the overall stability and longevity of your fence. Consider the following factors when assessing the durability of fence posts:
- Wood Species: If you choose wood posts, select a species known for its durability, such as cedar, redwood, or locust. These woods are naturally resistant to rot and insects.
- Metal Thickness: For metal posts, opt for thicker gauge metals, as they will withstand wind and impact forces better.
- Post Length: Longer posts provide greater stability, especially for taller fences.
Required Height
The height of your fence will dictate the length of fence posts you need. Determine the desired height of your fence and ensure that your posts are long enough to be buried at least 2 feet below ground and still extend the desired height above ground.
Additional Considerations
In addition to material, durability, and height, other factors may influence your fence post selection:
- Climate: Consider the climate in your area. If you live in a region with extreme temperatures or high winds, you may need to choose more durable posts.
- Soil Conditions: The type of soil you have can affect the stability of your fence posts. Sandy or loose soil may require longer posts or additional support measures.
Choosing the right fence posts is essential for building a fence that is both functional and aesthetically pleasing. By carefully considering the material, durability, strength, and height of your fence posts, you can ensure a sturdy and long-lasting structure that enhances the security, privacy, and beauty of your property. Remember, a well-built fence not only protects your property but also becomes a statement piece that complements your outdoor space.
Determining Fence Post Spacing: A Crucial Step for Fence Stability
When building a fence, it’s essential to ensure the posts are spaced correctly to maintain stability and prevent sagging. Determining the proper spacing is crucial for the fence’s longevity and overall appearance.
To calculate the optimal spacing between fence posts, consider the following factors:
- Height of the fence: Taller fences require closer post spacing for support.
- Length of the fence: Longer fences need more support, so posts should be spaced more closely.
- Type of fence: Some fence materials, such as chain-link or split rail, may require narrower post spacing for additional support.
- Wind load: In areas with high winds, posts should be spaced closer together to prevent wind damage.
General guidelines for fence post spacing:
- For fences up to 4 feet high: Space posts 6-8 feet apart.
- For fences 4-6 feet high: Space posts 5-7 feet apart.
- For fences 6 feet or higher: Space posts 4-6 feet apart.
Adjust the spacing based on the specific conditions of your property and fence design. For example, if you have a long fence in a windy area, you may want to space the posts closer together.
Incorrect post spacing can lead to problems such as:
- Sagging: Posts that are too far apart can cause the fence to sag or buckle.
- Wind damage: Widely spaced posts can make the fence more vulnerable to wind gusts.
- Uneven appearance: Inconsistent post spacing can create an unprofessional and unappealing appearance.
By following these guidelines and considering the specific factors of your project, you can determine the proper fence post spacing to ensure a stable, long-lasting, and visually pleasing fence.
Install Fence Posts: A Step-by-Step Guide
Installing fence posts is a crucial step in constructing a durable and sturdy fence. Here’s a detailed guide to help you navigate this process with confidence:
Digging Post Holes
Start by marking the locations of your fence posts along the fence line. Use a post hole digger to dig holes that are twice the diameter of the posts and one-third deeper than their height. Ensure the holes are vertical by using a level.
Setting Fence Posts
Place the fence posts in the holes and backfill the bottom 6 inches with gravel or crushed stone for drainage. Use a level to make sure the posts are plumb (vertical) and aligned with the fence line. Tamp down the gravel to secure the posts.
Pouring Concrete Mix
Mix concrete according to the manufacturer’s instructions. Carefully pour the concrete into the holes around the posts, filling them to within 6 inches of the top. Use a trowel to smooth the concrete surface and tamp it down to remove any air pockets.
Curing the Concrete
Allow the concrete to cure for at least 24 hours before attaching the fence boards. This will ensure a solid foundation for your fence. Keep the concrete moist by covering it with plastic or burlap and watering it regularly.
The Art of Attaching Fence Boards: A Comprehensive Guide
When it comes to building a fence, attaching the boards is a crucial step that ensures its stability and longevity. There are various methods to achieve this, each with its own advantages and considerations. In this guide, we will delve into the different techniques for attaching fence boards to fence posts.
Nail, Screw, or Bracket:
The most common method is using galvanized nails. They are inexpensive and easy to install, but they require precise hammering to avoid splitting the boards. Screws, on the other hand, provide a stronger hold and are less likely to loosen over time. Specialized brackets offer a professional and durable option, allowing for a secure and easily adjustable attachment.
Nail and Screw Tips:
- Use galvanized or stainless steel nails or screws to prevent rust.
- Predrill pilot holes to prevent splitting the boards.
- Countersink the nails or screws below the surface of the boards for a smooth finish.
Bracket Tips:
- Choose brackets designed for specific fencing materials and applications.
- Install brackets on every other post for optimal support.
- Ensure brackets are securely fastened to both the posts and boards.
Additional Considerations:
- Spacing: The spacing between fence boards will depend on the desired privacy level and wind resistance.
- Overlapping: Overlapping boards will prevent gaps and enhance durability.
- Finishing: Caulking or weatherstripping around the edges of the boards can further seal the fence from moisture and pests.
By carefully considering your options and following these tips, you can ensure that your fence boards are securely attached and will withstand the test of time. Whether you choose nails, screws, or brackets, the key to a sturdy fence lies in precise execution and attention to detail.
Add a Mesh of Protection or Aesthetic Appeal to Your Fence
If you seek to enhance the security or aesthetic value of your fence, consider adding a wire mesh. This versatile material can transform your fence into a more formidable barrier or an eye-catching design element.
Materials Required:
- Wire mesh panels
- Wire cutters
- Zip ties or wire
Step-by-Step Guide:
-
Measure and Cut the Mesh: Determine the length and height of the fence section you wish to cover. Cut the wire mesh panels to fit, ensuring they overlap each other slightly.
-
Attach the Mesh to the Posts: Use zip ties or wire to securely fasten the wire mesh to the fence posts. Start at the bottom and work your way up, ensuring the mesh is taut and free of snags.
-
Overlapping and Weaving: For added strength and security, overlap the ends of the mesh panels and weave them together using zip ties or wire. This will prevent gaps that could compromise the integrity of the barrier.
Benefits of Wire Mesh:
- Enhanced Security: A wire mesh adds an extra layer of protection to your fence, deterring trespassers or animals from entering your property.
- Increased Durability: Wire mesh can withstand the elements, making your fence more resilient to weathering and damage.
- Aesthetic Appeal: A well-installed wire mesh can add a decorative touch to your fence, complementing your home’s exterior or creating a more inviting atmosphere in your outdoor space.
- Versatile Customization: Wire meshes come in various sizes, materials, and finishes. You can choose the one that best meets your security, aesthetic, and budget needs.
Ensuring Stability with Brace Boards
For tall or long fences, brace boards provide an extra layer of stability to prevent them from toppling over. These diagonal supports reinforce the fence structure against strong winds or other forces that could potentially compromise its integrity.
Installing Brace Boards:
- Determine the location: Measure and mark the points where the brace boards will be attached to the fence posts.
- Cut the brace boards: Cut the boards to the appropriate length, ensuring they extend from the base of the fence post to the top rail.
- Drill pilot holes: To prevent splitting, drill pilot holes in the brace boards before attaching them to the fence posts.
- Attach the brace boards: Secure the brace boards to the fence posts using galvanized screws or bolts.
- Reinforce the connection: Use metal brackets or angle irons to reinforce the connection between the brace boards and fence posts.
Guidelines for Effective Brace Board Installation:
- Angle of the brace boards: The brace boards should be installed at a 45-degree angle to the fence posts for maximum stability.
- Spacing of the brace boards: Place the brace boards at regular intervals along the fence line, typically every 4-6 feet.
- Size of the brace boards: Use brace boards that are at least 2×6 inches for optimal strength and durability.
By incorporating brace boards into your fence design, you can enhance its overall stability and longevity, ensuring your fence withstands the elements and provides a secure boundary for years to come.
The Finishing Touches: A Touch of Elegance and Protection
As you complete your fencing masterpiece, it’s time to add the final flourish that transforms it from a mere barrier to a work of art. Finishing touches not only elevate the appearance of your fence but also enhance its longevity.
Firstly, consider post caps. These decorative toppers protect fence posts from the elements, preventing moisture penetration and rot. Choose from a variety of materials and styles to match your fence and enhance its visual appeal.
Next, a fresh coat of paint or stain can transform your fence into a vibrant statement piece. Not only does it add color and personality, but it also protects the wood from sun damage and moisture. Choose a high-quality paint or stain specifically designed for exterior use to ensure durability.
If you opt for a more rustic look, consider staining your fence. Stains penetrate the wood’s surface, enhancing its natural grain and providing a protective barrier against the elements. Apply multiple coats for optimal protection and a richer finish.
Remember, a well-maintained fence is not only visually pleasing but also a testament to your craftsmanship. By adding these finishing touches, you’ll not only enhance the beauty of your property but also ensure that your fence stands the test of time.
