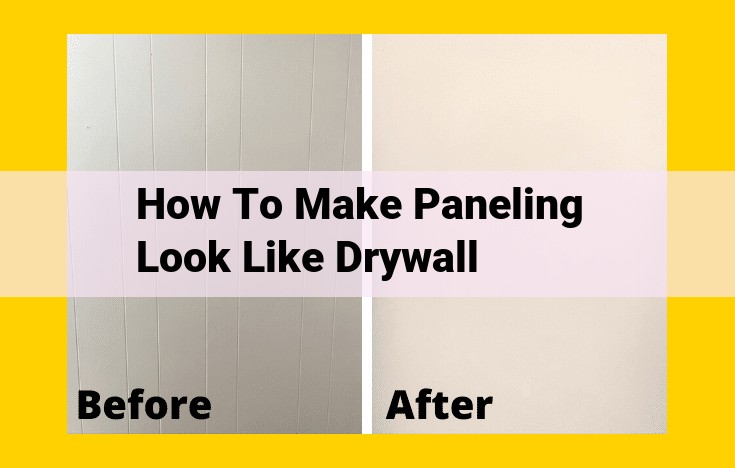
To make paneling resemble drywall, cover it with joint compound using a putty knife, feathering the edges to blend it seamlessly. After drying, sand the surface smooth, apply primer, and paint as you would drywall. This technique conceals paneling grooves and gaps, creating the illusion of a drywall finish.
Drywall Finishing Masterclass: A Step-by-Step Guide to Achieving a Perfect Finish
Essential Tools and Materials
Embarking on a drywall finishing project requires an array of essential tools and materials. These will enable you to tackle every stage with precision and efficiency. Gather the following items to ensure a successful outcome:
- Drywall mud: The foundation of a smooth finish, this paste-like substance comes in varying consistencies for different applications.
- Tape: Reinforces drywall seams, preventing cracks. Choose paper or mesh tape based on your specific needs.
- Primer: Prepares drywall for painting, blocking stains and improving paint adhesion.
- Putty knife: Various sizes and shapes are available for applying and spreading mud, creating smooth transitions.
- Drywall stilts: Optional but highly recommended for reaching higher areas without straining.
- Blade: Interchangeable blades for the putty knife, providing a sharp edge for precision cutting and scraping.
- Mud pan: Holds mud for easy access and mixing.
- Mixing drill: Thoroughly mixes mud to a smooth consistency.
- Measuring tape: Accurately measures and marks drywall for precise cutting and placement.
- Level: Ensures flat and even surfaces, eliminating bumps and dips.
- Sponge: Dampen and wipe away excess mud for a clean finish.
- Sanding block: Smoothes sanded surfaces, creating a uniform texture.
Taping and Mudding: Achieving a Seamless Drywall Surface
The art of taping and mudding drywall seams is crucial for achieving a smooth and even finish. It involves meticulously applying tape to the seams between drywall panels, followed by the application of drywall mud to conceal the tape and create a seamless surface.
Applying the Tape:
To begin, align the tape carefully over the seam, ensuring it is centered and free of wrinkles. Use a putty knife to gently press the tape into the seam, ensuring it adheres securely.
Mixing and Spreading the Mud:
Next, prepare the drywall mud by mixing it according to the manufacturer’s instructions. Use a mixing drill to achieve a smooth, lump-free consistency. Apply the mud to the taped seam using a wide blade putty knife, spreading it evenly and filling any gaps.
Creating a Smooth Surface:
Once the mud has been applied, use a narrower blade putty knife to smooth the surface. Hold the knife at a slight angle and make broad, overlapping strokes to remove any excess mud and create a feathered edge.
Coating and Feathering:
Repeat the mud application and smoothing process several times, allowing each coat to dry before applying the next. This layering allows for a gradual buildup of mud, resulting in a smooth and seamless surface.
Sanding for Perfection:
Once the mud is fully dry, sand the surface lightly using a sanding block. Use circular motions and gradually reduce the grit of the sandpaper as you smooth the surface. This final step will eliminate any minor imperfections and create a polished finish.
Feathering and Sanding: The Art of Achieving a Flawless Drywall Finish
When it comes to drywall finishing, feathering and sanding are crucial steps that determine the smoothness and aesthetic appeal of your walls. These techniques play a pivotal role in blending drywall mud into the existing surface, creating an undetectable transition between patched areas and surrounding drywall.
Feathering the Mud’s Edges
Feathering involves thinning the edges of the drywall mud, allowing them to seamlessly blend into the wall surface. To achieve this, hold your putty knife at a slightly angled position, apply gentle pressure, and spread the mud in outward strokes. Start from the center of the patched area and gradually work your way towards the edges, creating tapered layers of mud that overlap with the existing drywall.
Sanding to Create a Smooth Surface
The sanding process is essential for removing any imperfections or ridges left by the mud application. Use a medium-grit sanding sponge or block and gently sand the mudded area in circular motions. As you sand, apply light pressure and avoid overdoing it, as excessive sanding can weaken the drywall.
Once the mud has been smoothed out, switch to a finer-grit sandpaper and continue sanding to achieve a perfectly even texture. Sanding in both directions, both horizontally and vertically, helps to eliminate any scratches or imperfections, leaving you with a smooth and pristine surface.
The Importance of a Seamless Finish
Feathering and sanding are critical for achieving a seamless drywall finish that conceals any signs of repair or installation. By carefully blending the mud’s edges and sanding out any unevenness, you create an illusion of uniformity, making it virtually impossible to detect thepatched areas.
A well-feathered and sanded drywall surface provides a perfect canvas for primer and paint, ensuring a flawless and professional-looking result. So, don’t underestimate the importance of these techniques and take the time to master them for a truly exceptional drywall finish.
Priming and Painting: The Finishing Touches of a Pristine Drywall
After diligently taping and mudding your drywall, the final steps of priming and painting elevate your walls to new heights, transforming them from a raw canvas into a masterpiece. Understanding the purpose and application of primers and paints is crucial for achieving a flawless finish that complements your meticulous drywall work.
Purpose of Priming Drywall
Priming serves as a fundamental step before painting drywall. It acts as an adhesive bridge, enhancing the bonding between the bare drywall surface and the paint. By providing a uniform base, primers also block stains and prevent the absorption of paint, ensuring even coverage and a long-lasting finish.
Types of Primers
Selecting the optimal primer for your drywall depends on the surface conditions and intended paint finish. Latex primers are versatile and suitable for most drywall applications, offering excellent adhesion and stain resistance. For moisture-prone areas like bathrooms and kitchens, oil-based primers provide superior protection against moisture penetration. Self-priming paints simplify the process by combining primer and paint in one step, but may not offer the same level of stain blocking as dedicated primers.
Applying Primer
Before applying primer, ensure your drywall surface is clean and free from debris. Stir the primer thoroughly and pour it into a paint tray. Using a roller, apply an even coat to the drywall, working in smooth, overlapping strokes. Avoid over-applying, as excessive primer can cause peeling or cracking of the paint. Allow the primer to dry completely according to the manufacturer’s instructions.
Selecting the Right Paint
The choice of paint for your drywall is a matter of personal preference and intended use. Latex paints are popular for their versatility, ease of application, and quick drying time. Oil-based paints offer a more durable finish with excellent stain and moisture resistance, but require longer drying times and may emit stronger odors. Consider the color, sheen, and finish you desire to complement your décor and create the desired ambiance in the space.
Painting Techniques
For a professional-looking finish, apply multiple thin coats of paint rather than attempting to cover the surface with a single thick coat. This technique prevents runs, drips, and an uneven appearance. Allow each coat to dry before applying the next. Use a high-quality brush for edges and corners, and a roller for large areas to ensure an even distribution of paint.
By following these comprehensive guidelines for priming and painting drywall, you can achieve a seamless and pristine finish that enhances the beauty and functionality of your space.
Repairing Drywall Damage: A Step-by-Step Guide
Drywall is a versatile and durable material, but even the most well-maintained walls can suffer damage from time to time. Common drywall damage includes holes, dents, and cracks. These blemishes can be unsightly and diminish the overall aesthetic of a room. However, repairing drywall damage is relatively simple and can be done with a few basic tools and materials.
Holes
Holes in drywall can be caused by a variety of factors, such as nails, screws, or accidental impact. To repair a hole, first determine its size. For small holes (less than 1/4 inch in diameter), you can simply fill the hole with drywall mud using a putty knife. For larger holes, you will need to cut a patch of drywall to fill the hole.
Dents
Dents in drywall are typically caused by impact from objects or furniture. To repair a dent, first try to pop it out by gently pressing on the dent with a putty knife or the back of a spoon. If this does not work, you can fill the dent with drywall mud and then sand it smooth.
Cracks
Cracks in drywall can be caused by settling, movement of the building, or improper installation. To repair a crack, first widen the crack slightly using a utility knife. Then, apply a layer of drywall tape over the crack and smooth it out with a putty knife. Finally, apply a thin coat of drywall mud over the tape and sand it smooth.
Additional Tips
- When mixing drywall mud, follow the manufacturer’s instructions carefully. The mud should be smooth and creamy, but not too runny or too stiff.
- Use a damp sponge to smooth out the drywall mud and remove excess.
- Allow the drywall mud to dry completely before sanding.
- For best results, apply multiple thin coats of drywall mud and sand lightly between each coat.
Safety Precautions
When working with drywall materials, it is important to take safety precautions. Wear a dust mask to protect your lungs from inhaling drywall dust. Also, wear gloves to protect your hands from skin irritation.
Troubleshooting Common Drywall Finishing Woes
Every DIY enthusiast or homeowner embarking on a drywall finishing project inevitably encounters hiccups along the way. But fear not! With the right knowledge, you can turn these common problems into conquered challenges, leaving you with a flawless finish.
Nail Pops: The Annoying Bumps
When nails don’t sink flush into the drywall, they create unsightly “nail pops.” To remedy this, simply tap the nail back into place using a nail set or hammer. If the nail is too stubborn, remove it, fill the hole with drywall mud, and insert a larger nail.
Bubbles: The Pesky Air Pockets
Bubbles in the mud can lead to fissures and unevenness. To prevent them, ensure the mud is properly mixed and the drywall is thoroughly saturated. If bubbles do appear, carefully prick them with a knife and smooth out the area with a damp sponge.
Uneven Surfaces: The Frustrating Imperfections
Feathering, or tapering the edges of the mud, is crucial for creating a smooth surface. Use a putty knife to gently spread the mud away from the joint, creating a gradual transition. Sand the feathered area lightly to eliminate any imperfections. If the surface remains uneven, apply additional coats of mud, allowing each to dry before sanding.
By addressing these common issues proactively and following these tips, you can achieve a professional-looking drywall finish that will enhance the aesthetics of your home for years to come. Remember, the key to a successful project lies in careful preparation, attention to detail, and a willingness to troubleshoot along the way.
Emphasize the importance of safety when working with drywall finishing materials. Provide tips for protecting your hands, eyes, and lungs, and for handling hazardous substances safely.
Safety Precautions for Drywall Finishing Masterclass
When undertaking a drywall finishing project, prioritizing safety is crucial. Here’s a comprehensive guide to protect yourself during the process:
Protect Your Hands:
- Wear gloves: Nitrile or rubber gloves shield your hands from contact with drywall mud, which can cause irritation.
- Apply lotion: Regularly moisturize your hands to prevent dryness and keep skin supple.
Shield Your Eyes:
- Wear safety glasses: Prevent dust, debris, and drywall mud from entering your eyes by wearing protective glasses.
- Ventilate the area: Ensure proper ventilation to minimize dust and fumes in the air.
Safeguard Your Lungs:
- Use a dust mask: Inhale dangerous particles by wearing a dust mask rated for drywall dust.
- Control dust: Use a dust collector or vacuum cleaner to remove excess dust from the work area.
Handle Hazardous Substances Safely:
- Read MSDS sheets: Familiarize yourself with the Material Safety Data Sheets (MSDSs) of all materials you use.
- Avoid skin contact: Wear protective clothing and gloves when handling hazardous chemicals, such as drywall mud and joint compound.
- Proper disposal: Dispose of used materials and waste according to manufacturer’s instructions.
Remember, your safety is paramount. By following these precautions, you can minimize risks and ensure a successful drywall finishing project.
